


This is THE Slow Cooker Pot Roast that has been our go-to comfort meal for more than 15 years and 100+ dinners! Our simple season, sear, pour and go method uses just 6 ingredients and 15 minutes of hands-on time to make what one reader says is "the easiest and most delicious roast I have EVER made in my almost 44 years of life." It makes a truly tender roast that really does melt in your mouth (if you don't believe me because you've never been able to accomplish that texture yourself, we wrote this post for you)!
Love a good Crock Pot chuck roast? We have over ten more set-it-and-forget-it ideas in our collection of Chuck Roast Recipes.

Skip to:
- Recipe notes from Danielle & Misty
- What cut of meat is best for pot roast?
- Ingredients
- Why you should sear your pot roast before slow cooking
- How to make Crock Pot chuck roast
- Serving tips
- For a crowd
- What to serve with pot roast
- How to Know When Your Chuck Roast Is Done: What to Expect at Each Stage
- Questions & Answers
- Tips & Tricks
- More recipes
- Recipe
- Comments
Before this recipe was ever a thing, our easy Slow Cooker Tri-Tip (lovingly termed "Yummy Tri-Tip" in our family) was a staple for cozy family dinners. It was later when we saw this recipe on Joyously Domestic that we were inspired to make a beef roast version reminiscent of the tri-tip flavor, but simplified!
While it's most popular in the fall and winter months, we really end up making this all year long because it doesn't require turning on the oven in the summer. It's great for busy weeknights and equally great for Sunday supper.

Recipe notes from Danielle & Misty
This recipe became what it is because of real-life experience. We weren't even "food bloggers" when we "developed" it. Just a regular family making it a gazillion times, tweaking things based on what we had on hand and how much effort we wanted to put in that day. I'm going to be bold and just say it: This is it.
- Cut of beef: We've tried several common cuts, and there is literally only one we will ever use now (hint: it's chuck roast). We'll explain exactly why below.
- Sear vs no sear: Listen, Linda. I can tell you from experience that skipping the sear seriously minimizes the flavor. Trust me on this one.
- Vegetables: No hate on anyone else's preference, but my family isn't interested in soggy Crock Pot vegetables. So we ditch them and make really great ones on the side. But if you like the all-in-one-pot method, we have instructions for veggies included.
- Gravy: Nobody wants to move the cooking juices and dirty another pan to make gravy. We wanted a self-making gravy, if you will. So we skip the flour and butter roux and use cornstarch right in the slow cooker instead.
- Cooking time and heat: Low and slow heat is our favorite for a reason. We've made it on high heat, but for the BEST roast of your life low heat is king. We explain why below!
What cut of meat is best for pot roast?
In my opinion a boneless chuck roast is the best option for pot roast. It is affordable and has great marbling throughout, which makes the meat tender, flavorful, and fall-apart tender. I don't find that rump roast comes out as a tender.
Ingredients
- Oil: You can use olive oil or vegetable oil.
- Chuck roast: This is my go-to cut of beef for pot roast. When choosing your beef chuck roast, look for one that has good marbling but not too much fat around the outside. If it does, simply trim up the excess.
- Seasoning: We use this Pot Roast Seasoning recipe, which combines steak seasoning - I use McCormick Grill Mates Montreal Steak Seasoning [affiliate] - and dried thyme. You may substitute fresh, but you will need to use 3x the amount.
- Beef broth: You can use canned beef stock or beef bouillon.
- Cornstarch: Thickens the juices at the end for a simple gravy.
Technique
Why you should sear your pot roast before slow cooking
The reason you sear the meat is to create a golden brown crust through the Maillard reaction. That's just a fancy term for what happens when meat hits high heat, creating a crusty brown exterior and flavor you can't get any other way. BONUS: It also leaves brown bits in the bottom of the pan that we will deglaze and add to the slow cooker for more flavor.
IMPORTANT ⇢ It is essential to monitor the heat of your skillet to avoid burning the meat or seasonings. Our goal is a deep brown crust, not a black one! High heat works well on most stoves, but if your pan is smoking excessively or anything starts to burn, turn the heat down. But don't turn it too low or you won't get the beautiful sear you're going for.
How to make Crock Pot chuck roast
Season, sear, pour, and go! Honestly, it's that simple. You may be tempted to make this in your Instant Pot or dutch oven, but I find that nothing beats the tender roast from a slow cooker (affiliate).
For extra cooking tips, check out our Ultimate Guide: How to Cook Chuck Roast in the Slow Cooker.

1. Coat the beef roast in oil, then season roast generously.
2. Sear the meat in a hot skillet to get a golden crust. Place in the Crock Pot.

3. Simmer the beef broth in the hot skillet for 1 minute, scraping up the bits from the bottom. Pour over the roast.
4. Cook on low heat for 7 hours or on high for 3.5-4 hours (low is preferred).
About an hour before the roast is done it is time to thicken the gravy. Dissolve the cornstarch in water to make a cornstarch slurry, then add it directly to the liquid in the slow cooker. Do NOT pour it directly over the meat.
Use a spoon to stir it all together until thoroughly combined. Replace the lid and continue to cook for another hour on low. The roast should be fork tender and come apart very easily when it's done.
Serving tips
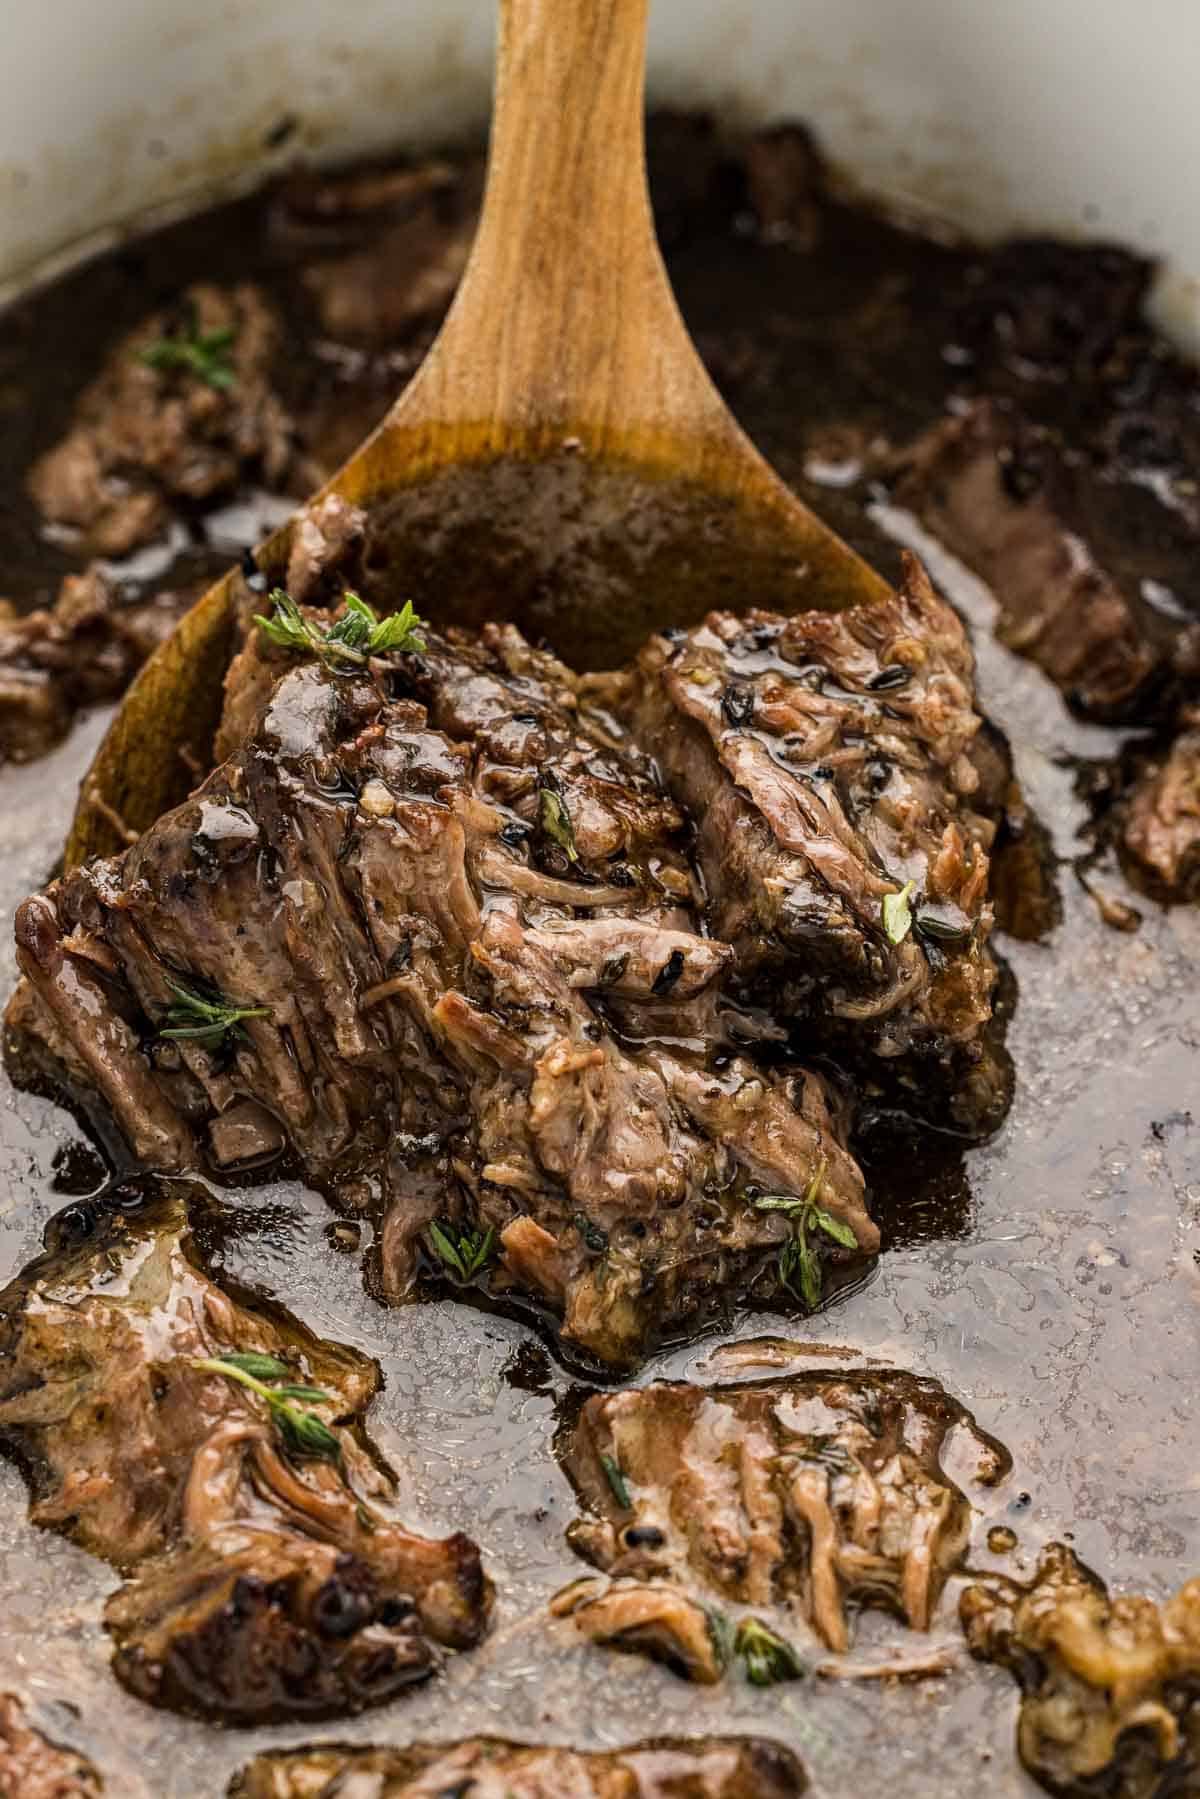
Before serving I like to separate the meat from the fatty sections. While cooking, the fat keeps the roast tender and flavorful, but at the end it is unappetizing. The simple solution is to place the roast on a cutting board and gently separate the sections of meat from the fat, discarding the fat. Then pour the rich gravy over the top of the roast and serve.
For a crowd
This is the best Crock Pot roast recipe for a crowd, especially for chilly fall or winter weekend. It's important to not overcrowd the slow cooker. If you are doubling the recipe, try making it in two different crockpots to allow each to cook correctly without drying out.
What to serve with pot roast
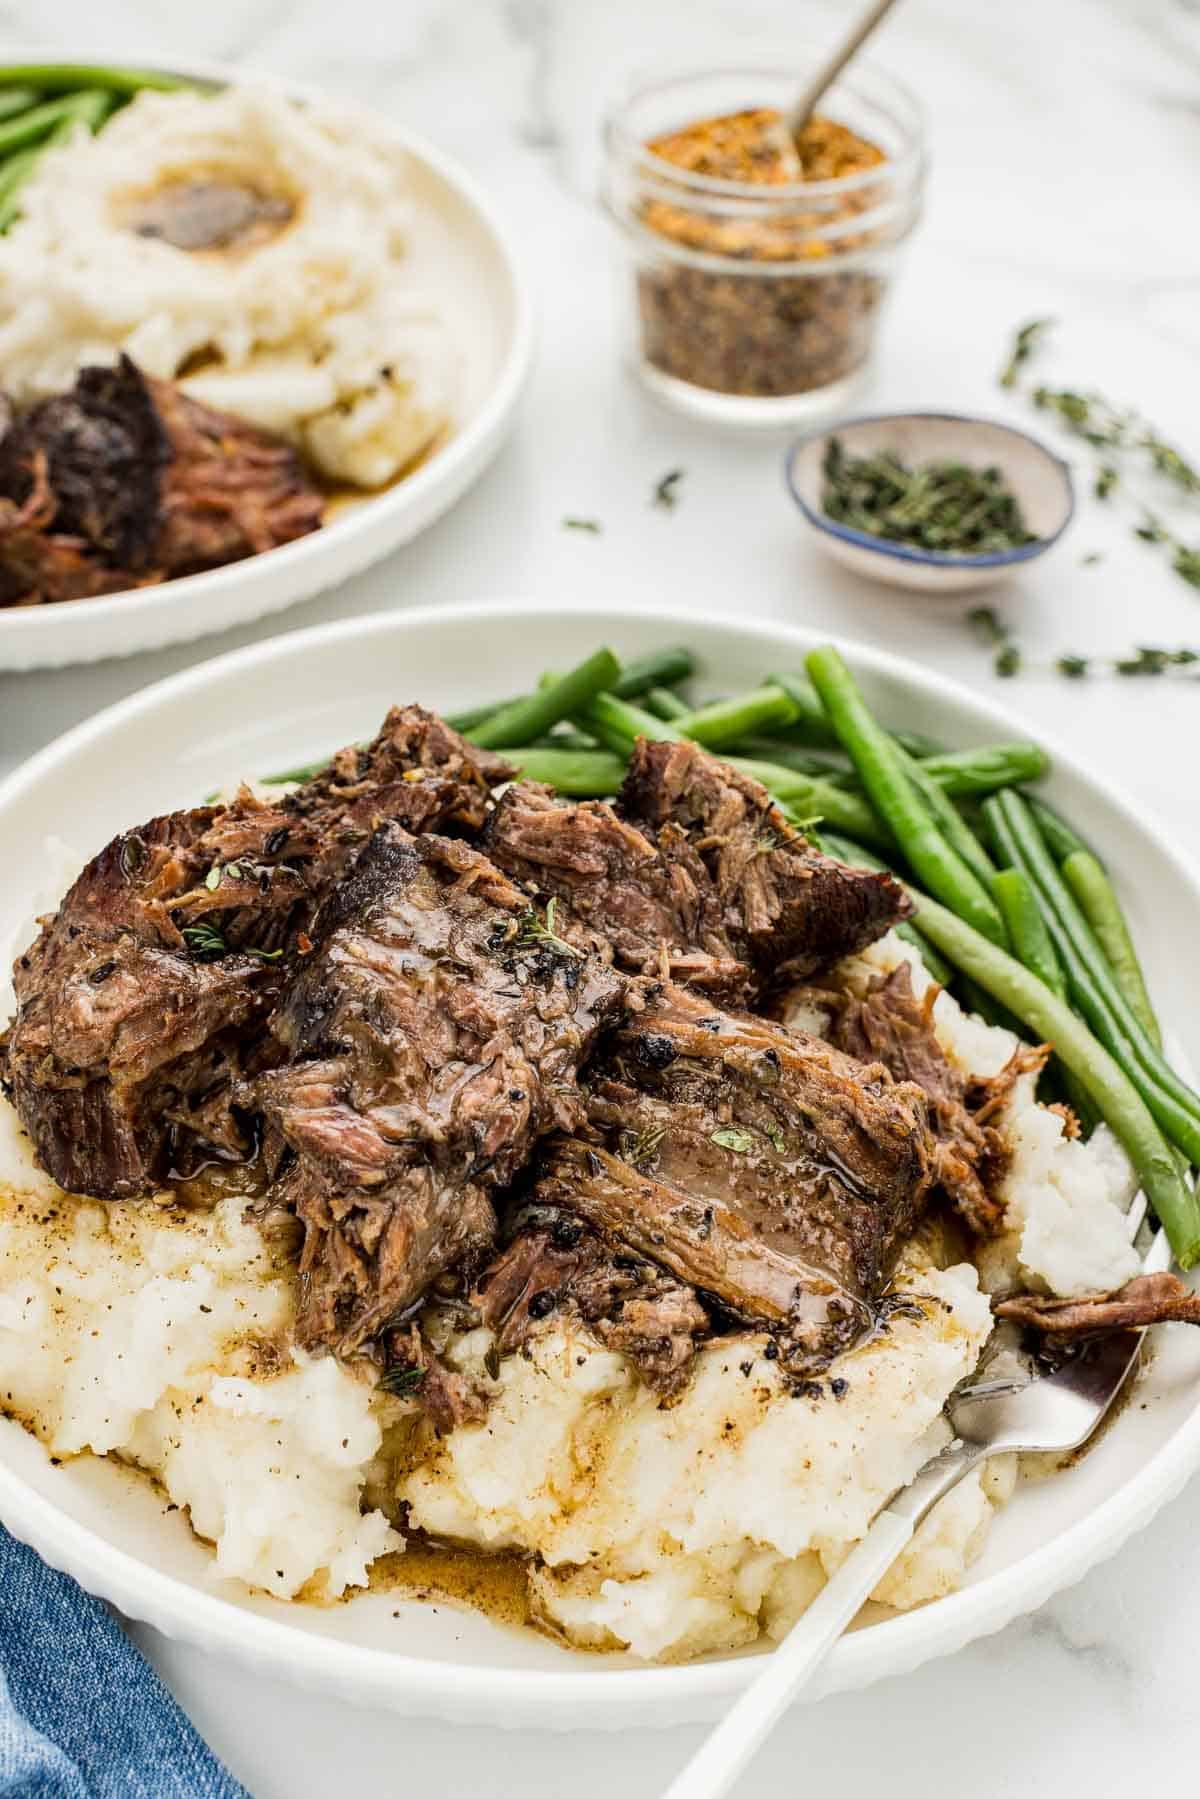
This is the perfect pot roast to serve with mashed potatoes (our go-to are these Red Skinned Mashed Potatoes - no peeling or scrubbing necessary). I also like to serve green beans and a favorite bread, such as these Rhodes Rolls or these Easiest Cream Biscuits.
For a full post with more roast beef sides, check out our 10 best pot roast sides!
How to Know When Your Chuck Roast Is Done: What to Expect at Each Stage
Guys, stop eating tough pot roast. This is how to get the fork-tender texture you're hoping for.
In the first couple of hours, your meat will actually get firmer and tougher. If you put a fork in it, you'll notice it doesn't budge or shred at all. Don't panic! This is to be expected and just tells you that the connective tissue needs more time to break down.
Low, gentle heat over a long period of time allows the tough fibers to soften while the fat slowly renders, leaving you succulent, tender beef. The longer it cooks, the more tender it will get. While high heat can work, it can also cause the fibers to seize and toughen. In our experience low heat really is the best!
You should start checking a 3-4 pound roast around the 8 hour mark. You'll know it's done when it is fall-apart tender (seriously, it should fall apart super easily when you use two forks and gently twist or separate the meat). If it still feels tough or resists shredding, just put a lid on it and cook for another 1-3 hours. Every roast (and slow cooker) is a little different, so don't rely on time alone. Keep cooking until it's tender!
Questions & Answers
You can season the roast and wrap tightly in plastic wrap, then refrigerate the night before or freeze for the future. If frozen, thaw in the fridge for at least 24 hours before cooking. Do not freeze the roast after cooking since it will come out dry and tough.
You can cook your pot roast on high for 3.5-4 hours. However, I find that cooking it on low yields a more tender, moist pot roast.
If you prefer to make Crock Pot roast with vegetables you can add carrots, onions, and potatoes (red potatoes, Yukon Gold, or Russet work well). See the recipe card for instructions. Note that baby carrots cook quickly and may be best added part-way through the cook time.
Store in an airtight container for 3-4 days. Reheat gently in the microwave.
Tips & Tricks
- Trim the meat before seasoning if it has too much fat around the outer edge.
- Make sure your pan is very hot in order to get a good sear.
- Simmer the beef broth for a couple seconds before scraping up the bits off the bottom. Adds tons of extra flavor!
- Dissolve all the cornstarch in the water before adding to the hot liquid. This will avoid clumpy gravy.
More recipes
- 4 Ingredient Potato Soup and White Chicken Chili are ultra-simple Crock Pot recipes the entire family will enjoy.
- Smothered Burritos with Slow Cooker Shredded Beef - Make this flavorful shredded beef in the Crock Pot, then shred and turn into cheesy burritos covered in enchilada sauce. Yum!
- Learn How To Make Brown Butter In the Slow Cooker with this easy step-by-step guide!
- Crazy Good White Chocolate Raspberry Cheesecake
- Orange Bread (Has rave reviews!)
- Turkey Breast Brine - It's the only way to make a juicy turkey, truly.
- Christmas Bundt Cake - Classy, yet easy!
Recipe

Crock Pot Chuck Roast (SO tender and easy!)
Equipment
Ingredients
- 1-2 tablespoons olive oil
- 3-4 lb chuck roast trimmed if needed
- 2 tablespoons Montreal steak seasoning
- 1 tablespoon dried thyme
- 1 cup beef broth
- ⅓ cup water
- 1 tablespoon cornstarch
Optional Vegetables
- 2 lbs potatoes red, yukon, or russet
- 1 lb carrots optional
- 1 yellow onion optional
- 1 tablespoon Montreal steak seasoning optional
- 1½ teaspoon dried thyme optional
Instructions
- Coat each side of the roast with oil. Combine steak seasoning and thyme in a small bowl. Liberally season both sides of the roast.1-2 tablespoons olive oil, 3-4 lb chuck roast, 2 tablespoons Montreal steak seasoning, 1 tablespoon dried thyme
- Heat a large cast iron skillet over high heat (*see note). Once the skillet is hot, sear each side of the roast for 2-3 minutes. Place roast in slow cooker.
- Pour beef broth into skillet. Allow broth to simmer for one minute. Scrape the bits up off the bottom of the skillet. Pour all liquid from skillet into the slow cooker.1 cup beef broth
- *OPTIONAL: If using vegetables wash, peel, and cut them into large pieces (about 3 inch chunks). Add them to a large bowl, then drizzle with a little bit of oil. Sprinkle on seasonings and mix until evenly distributed. Top the roast with the vegetables.2 lbs potatoes, 1 lb carrots, 1 yellow onion, 1 tablespoon Montreal steak seasoning, 1½ teaspoon dried thyme
- Cook on low for approximately 7-8 hours or high for 3.5-4 hours. I prefer low whenever possible.
- Around hour 7-8 (or 3.5-4 if your slow cooker is on high) begin checking for tenderness with a fork by pulling apart gently. Once the roast just begins to fall apart around the edges, dissolve the cornstarch in the water and pour into the liquid left in the slow cooker. Stir well to combine. Cover and allow to cook for 1 more hour, or until the roast is super tender and the juices have thickened.⅓ cup water, 1 tablespoon cornstarch
- After an hour, the gravy should be thick enough to coat the back of a spoon. If it isn't leave the slow cooker on high with the lid off while you prepare the meat in the next step. That will allow extra water to evaporate, thickening the juices.
- Before serving, carefully remove meat from slow cooker and place onto a cutting board. Gently separate the meat from the fatty sections. Discard the fat. Place the large chunks of meat back into the thickened juices in the slow cooker and serve.
Notes
- TLDR: What You Really Need to Know
-
We cover all of these tips in depth throughout this post. But if you just don't have time (or interest) in reading the whole thing, this is what you really need to know.
- Secret #1: Ensure that you buy a chuck roast that is well marbled with fat all throughout. The fat cooks downs and keeps the meat really moist, which is a game changer in terms of final texture.
- Secret #2: Don't skip the sear. It is essential to flavor. Watch the heat on your burner carefully so that it doesn't burn.
- Secret #3: Although you can use high heat on your slow cooker, low heat will always produce a fall-apart roast. Low heat breaks down the fibers gently, whereas higher heat yields less tender results.
- Secret #4: Time is the most important. Tender roasts simply are roasts where the meat fibers have truly broken down enough to be soft. If you have had roasts that aren't tender in the past, they likely just needed to cook longer. I find that 9 hours is my preferred sweet spot, but 8-10 is a great range. If you test it at 8 hours and it isn't as tender as you like, just let it keep cooking for 1-2 hours.
Add Your Own Notes
Nutrition
All nutrition information is provided by a third party and is an estimate only. Use your own nutritional calculator for more specific measurements.


Maddie says
This is one of my favorite recipes because of how simple it is and how great the results turn out everytime. The cut of beef is very important to the success of this dish y'all.
Misty Miller says
Hi Maddie! Reviews like this make our day, thank you for sharing your experience!
Myrleen says
Can you use olive oil?
Danielle says
Yes, olive oil works well.
Ingrid says
Tried this tonight for Sunday dinner. It was delicious and everyone enjoyed it!
Misty says
We're so glad you liked it, Ingrid! Thanks for taking the time to share.
Dan Dealy says
Found this recipe a few months ago when I lost my mom's recipe (you know, the one you called her for, wrote it on the back of a handy used envelope back in college, lots of grease & gravy stains... heartbreaker). This is now my GoTo. SO SIMPLE. Def use CI to sear. Not to laugh, but from a few years of getting a certain NE-based box of steaks for birthdays & Christmas, there's a whole drawer of "favorite steak seasoning" and it works great! (Do NOT tell my foodie family & friends or some FoodNetwork chef, but that stuff tastes awesome in this peoduction). Another thing that has worked is to keep au jus from Arby's French Dip and our local upper scale restaurant's shredded Angus French Dip sandwiches in a mason jar in the fridge and use that as part of the broth when covering the roast in the cooker.
Anyway... great, easy recipe!
Misty says
So glad you loved it!
Fernando says
Hi!
Doing this recipe for the second time since the first time it was a smash hit at home! I use my own steak seasoning with just salt, paprika and powdered garlic and it was delish. The Thyme flavor really comes trough even after 6-7 hrs of cooking.
I saw a comment that the thyme burnt when searing the beef, I saw a bit of that also, I did sear for more time than the recipe states, but it didn't affect the end result.
10 out of 10.
Thanks!
Misty says
We're so happy you like it, Fernando! We don't find that the thyme burns typically, but you can always add the thyme straight to the pot instead of searing it on the meat. Thanks for sharing your feedback!
Annie says
This came out super tender and delicious! Followed the recipe exactly, also leaving out the veggies as my family prefers them on the side. Everyone came back for seconds!
Misty says
So glad you liked it, Annie!
KC says
Terrible.
Misty says
Hi KC! I am sorry to hear you did not enjoy this recipe. It has a 4.8 star rating from our many readers because it really is a favorite! I would love to help you troubleshoot, if that is helpful. We include a bunch of tips in this post because nailing a roast comes down to a few essential tricks. But these are the main ones:
1. Well marbled: Ensure that you buy a roast that is well marbled with fat all throughout. The fat cooks downs and keeps the meat really moist, which is a game changer in terms of final texture.
2. Low heat: Although you can use high heat, low heat will always produce better results. Low heat breaks down the fibers gently, whereas higher heat shocks the meat fibers and causes them to seize up, yielding less tender results.
3. Time: This is the most important. Tender roasts simply are roasts where the meat fibers have truly broken down enough to be soft. If you have had roasts that aren't tender in the past, they likely just needed to cook longer. I find that 9 hours is my preferred sweet spot, but 8-10 is a great range. If you test it at 8 hours and it isn't as tender as you like, just let it keep cooking for 1-2 hours.
Bob Johnson says
Whoa! I have a 3 pond $25 chuck that was just ruined. I cooked on low and stopped to check it at 5 and a half hours. It is tough as beef jerky. I'm guessing it was done a lot earlier. Seven hours and it would have been cement.
Danielle says
Bob,
I a so sorry to heat that you did not have success with this recipe. It is one of our highest reviewed recipes so I am confident that it works. I would love to help troubleshoot this for you. My first thought is that at 5 hours the roast may not have been cooked through and falling apart. You have to get beef to an internal temperature of 205º for it to melt the connective tissue and melt into a sure tender piece of meat. On low that takes around 8 hours. The only other thing I can think is that your slow cooker is cooking at a higher temperature on the low setting than is typical. We use a 6 quart Crockpot brand slow cooker. I hope that helps, but if you have anything else I can help with, don't hesitate to reach out.
C Bartoli says
Suggestions for a bigger roast? Double ingredients? Increase time?
Danielle says
Hello! This really depends on how much bigger your roast is. If it’s about double the size, then yes, go ahead and double the seasonings. I’d also either use a bigger slow cooker and plan for a longer cook time, or cut it in half and use two slow cookers so you can follow the recipe as written.
The goal is super tender, fall-apart meat, so thickness matters here. A thicker roast is going to take quite a bit longer for the center to fully cook.
If it’s only a pound or two bigger, you don’t need to go overboard, just bump up the seasonings a bit and add an extra hour or two to the cooking time. I hope this helps. If you have any other questions, feel free to ask.
Cindy says
Thank you! Roast was over 5 lbs so multiplied all by 1.5. Cooked 9 hrs on low and it was perfect. Rave reviews from all. And we have leftovers!!
Danielle says
That is great! So happy to hear!
KAYLA SIMONIS-PLAUTZ says
this was wonderful. i used the slow cooker method on the instapot and did that on medium for 4 hours and then 2hrs on pressure cook. we added carrots and a cpl celery sticks and fresh thyme leaves and sticks. took some juice and added cornstarch to that and poured it bak in on saute function. omg amazing.
Misty says
So glad you liked it! Thank you for taking the time to share, Kayla!
Mark Mathews says
I haven’t tried this recipe yet but it looks very good, whether I add veggies to the crockpot or not.
I have tried crockpot chuck roasts before but the meat, although it tastes good, is never as tender as the recipes indicate. I am wondering what the “magic” is to getting the tenderness where the meat comes close to falling apart. Is is critical that the meat is completely “under liquid?” Is the key to keep the meat UNDER liquid AND setting the crockpot to its lowest setting and make sure it cooks for at least 7-8 hours? Does using a time less than a minimum time NOT produce the tenderness? I’m looking for a recipe that works every time!!! 🙏🏼
Misty says
Hi Mark! These are great questions. You are not the only one who has made a chuck roast before that is not super tender, but I promise you it is absolutely possible. There are three keys in my opinion. Hope these help!
1. Well marbled: Ensure that you buy a roast that is well marbled with fat all throughout. The fat cooks downs and keeps the meat really moist, which is a game changer in terms of final texture.
2. Low heat: Although you can use high heat, low heat will always produce better results. Low heat breaks down the fibers gently, whereas higher heat shocks the meat fibers and causes them to sieze up, yielding less tender results.
3. Time: This is the most important. Tender roasts simply are roasts where the meat fibers have truly broken down enough to be soft. If you have had roasts that aren't tender in the past, they likely just needed to cook longer. I find that 9 hours is my preferred sweet spot, but 8-10 is a great range. If you test it at 8 hours and it isn't as tender as you like, just let it keep cooking for 1-2 hours.
Mark Mathews says
I am very pleased to report that the roast I made right after asking my questions turned out perfectly. Thank you for your help.
Misty says
Hi Mark! Yay, we are so glad to hear that!! Thank you for taking the time to come back and share your experience.
Kim says
Having the pan on high heat for that long with no oil in the rest of the pan burned my very nice stainless steel pan and burned my roast. There are no directions to guide you on seasonings for the vegetables. Expensive recipe had to go in the trash.
Misty says
Hi Kim, I am so sorry to hear you had that experience. This has been an incredibly succesful recipe for both us and our readers. Cooking with stainless steel is a very specific process. It absolutely can work for this recipe, but ensuring the temperature is exactly right is essential for all stainless steel cooking. We prefer cast iron for this recipe as it easily handles high heat without too much maintenance. I have added a note to the recipe card to provide better instruction on this. Detailed instructions for how to season the vegetables are provided in step number 4. We appreciate your feedback.
Monica says
Delicious! I followed the recipe except I made my own steak seasoning since I didn’t have any on hand. I started on low and moved it to high during the last two hours because I had a hungry toddler and I wasn’t confident it would finish up in time. It turned out so tender! I’ll definitely add this to my recipe binder
Misty says
So glad you liked it, Monica!
Rox says
I made this recipe for a food prep. It was wonderful. The only issue is the thyme burnt when seared at high heat. It left crunchy burnt black bits in the gravy. I am not sure if to leave the thyme out or turn down the heat? Making again next week.
Misty says
Hi Rox! So glad that you liked it. We don't notice our thyme burning, but you could definitely reduce the heat a bit and see if that helps. The other option is to sear the meat and add the thyme directly to the slow cooker instead. Then you will still get the wonderful flavor!
Ashley says
Amazing!!
Misty says
So glad you like it!
Erin H Bailey says
My spice rub burned badly during searing. I didn't even have any thyme on hand so I left it out. Maybe my cooktop gets hotter than most? I'm hoping that won't make the gravy bitter.
Misty says
Hi Erin, I am sorry that you had this experience. The seasoning does get quite dark during searing, but it should not burn. I would not anticipate it to badly impact the final flavor, however. My best advice is to start searing as soon as the pan is really hot. If it sits on the heat for too long, it overheats. You can also flip the meat to the other side a bit sooner, if you feel the pan is overheated a bit. I hope this helps and hope you enjoyed the final roast!