

This Crunchy Chicken Tacos Recipe is baked in the oven for golden, crispy, cheesy perfection! It's both a weeknight winner and party worthy addition to our one pan dinner recipes collection. Use poblanos, onions, and classic Mexican seasonings to make the ultimate shredded chicken filling, then layer onto corn tortillas with spicy pepper jack cheese.
Even better is that you can make the filling ahead or freeze it for the nights when you want crispy baked tacos in your mouth ASAP. Read on for our top tips, plus our favorite salsa and side pairings.

Since we're lucky enough to live near the West Coast, we've been making authentic Mexican dinner recipes for years! Today's recipe is a twist on a Mexican classic.
For more taco inspiration, one of our favorites is these Dutch Oven Carnitas or these Beef Chuck Roast Tacos served with the best Mango Habanero Salsa. For more chicken tacos, try these Slow Cooker Pineapple Chicken Tacos!
Serve these for a quick weeknight dinner or even as a party appetizer - try using it as part of your Game Day Recipes!
Skip to:
Ingredients for baked chicken tacos
This recipe calls for several pantry items and a bit of fresh produce, but all of them should be easy to find at your local grocery store! Ingredient quantities are in the recipe card below.
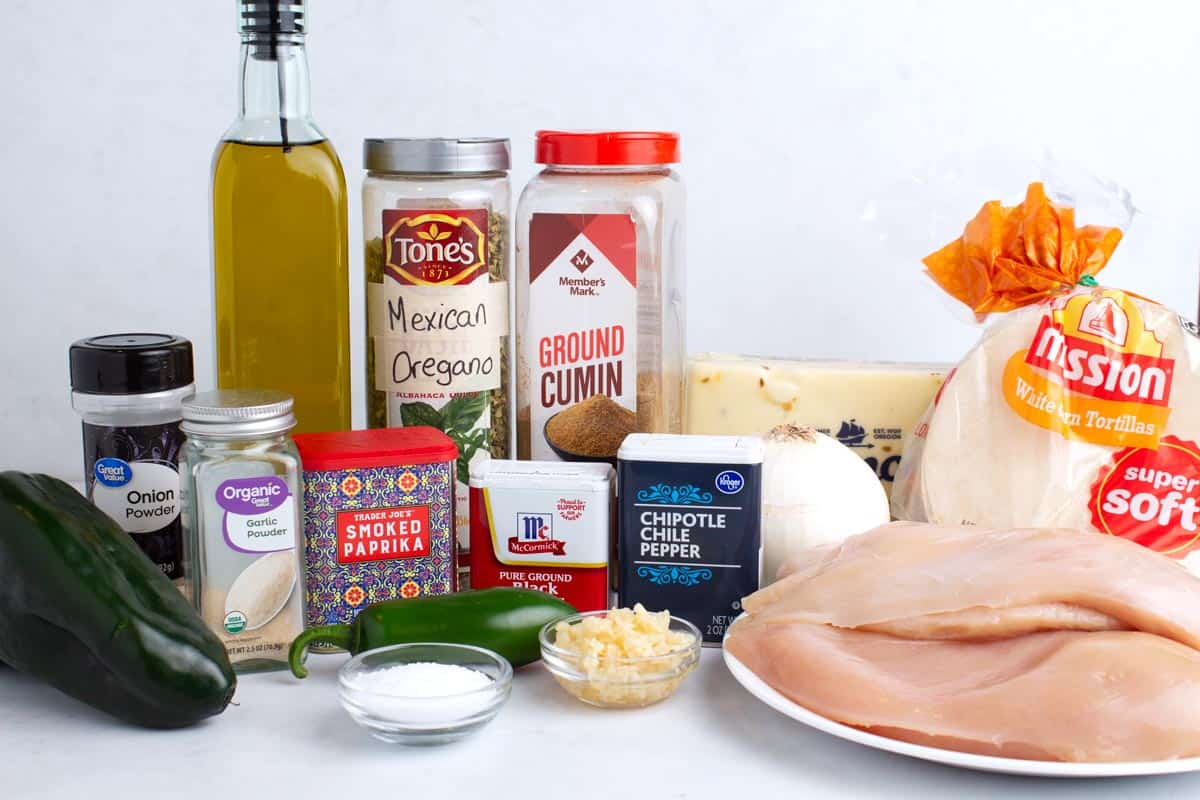
- Chicken breast: They will cook more evenly if you cut them in half horizontally first.
- Olive oil: You can substitute avocado oil.
- Poblano peppers: Poblanos are a very mild (not spicy), medium-sized green pepper. Your grocery store may also have them labeled as pasilla peppers.
- Onion: I usually opt for white onions, but yellow will work as well.
- Jalapeno: Keep the seeds for a hint of spice.
- Garlic: I buy mine minced for the sake of ease.
- Spices: You will need chipotle powder, cumin, smoked paprika, kosher salt, ground black pepper, garlic powder, onion powder, and Mexican oregano. That last one can typically be found in the ethnic aisle of your store if it isn't with the other spices.
- Corn tortillas: Use white or yellow. The key is to buy fresh, soft ones so they don't crack when you fold them. We've had success with Mission Super Soft Corn Tortillas. Flour tortillas don't get as crisp.
- Pepper jack cheese: You can substitute with monterey jack, colby jack or cheddar cheese if preferred.
- Toppings: We love this avocado green salsa, some lime wedges and a bit of sour cream, but use your favorite toppings.


How to make crunchy chicken tacos
Start by preheating the oven to 450 degrees Fahrenheit. Line two baking sheets with foil for easy clean up.
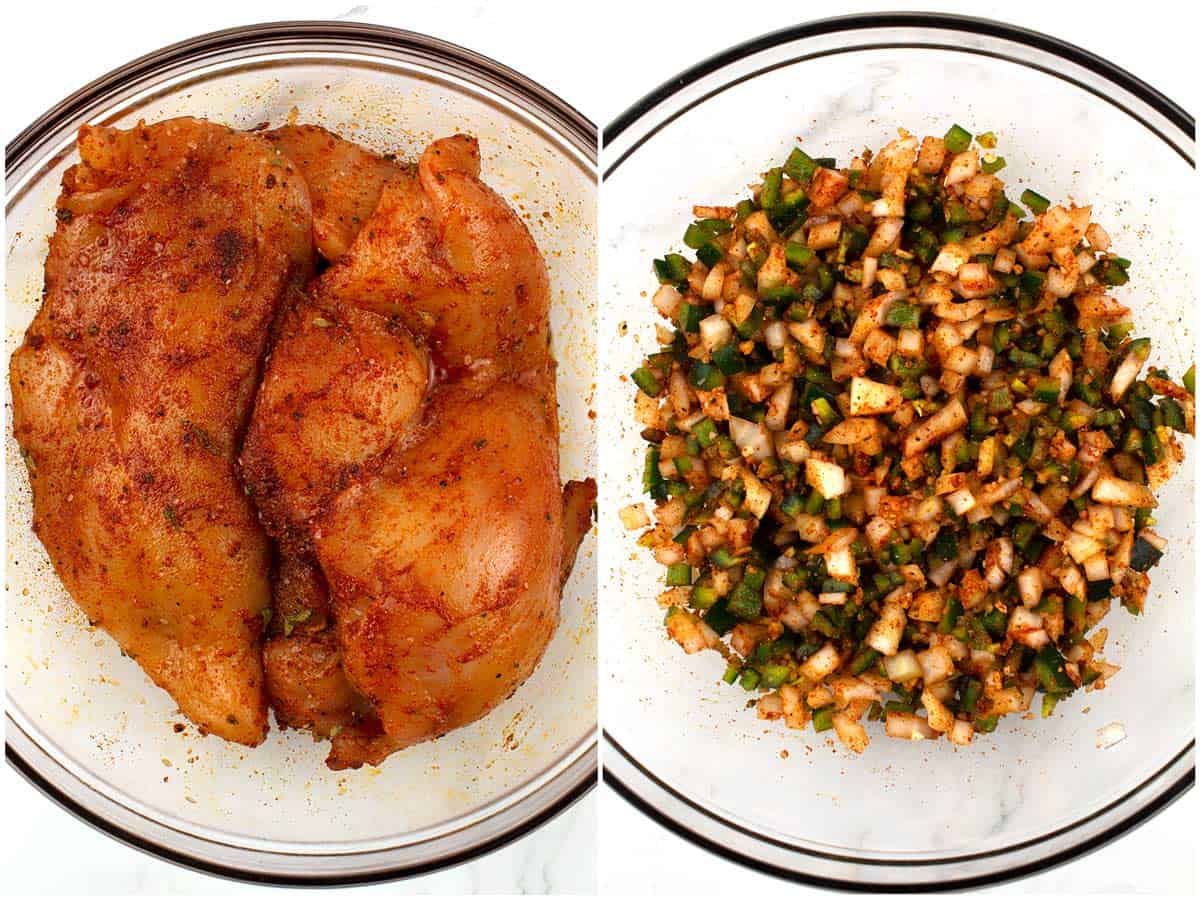
Combine all the seasonings in a small bowl. In a separate large bowl, combine the chicken breast, oil, and half the spices. Then spread the chicken evenly on the pans.
In the same bowl, toss the chopped veggies and remaining spices.
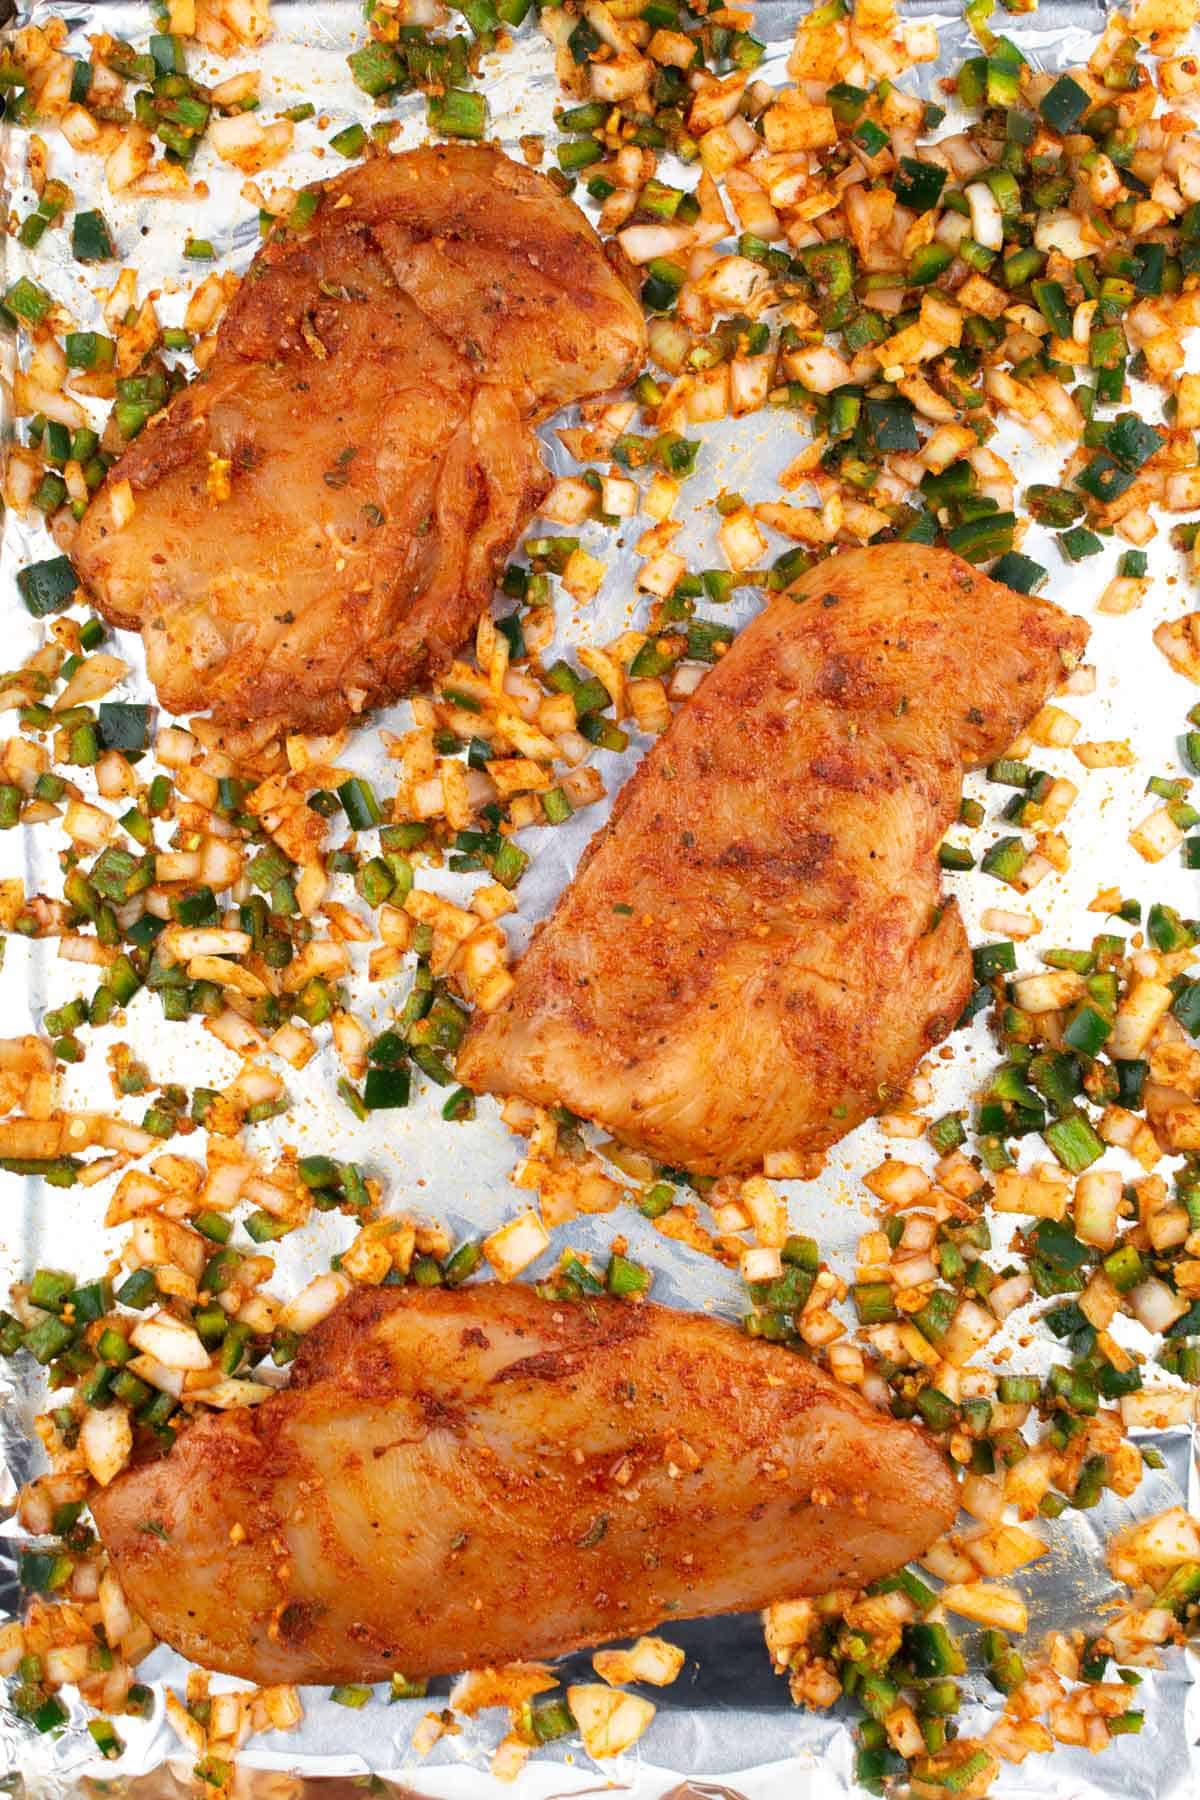
Sprinkle the veggies around the chicken, distributing them evenly between the two pans. Bake for 15-20 minutes, or until the chicken reads 165°F on an instant thermometer and shreds when pulled apart with two forks.
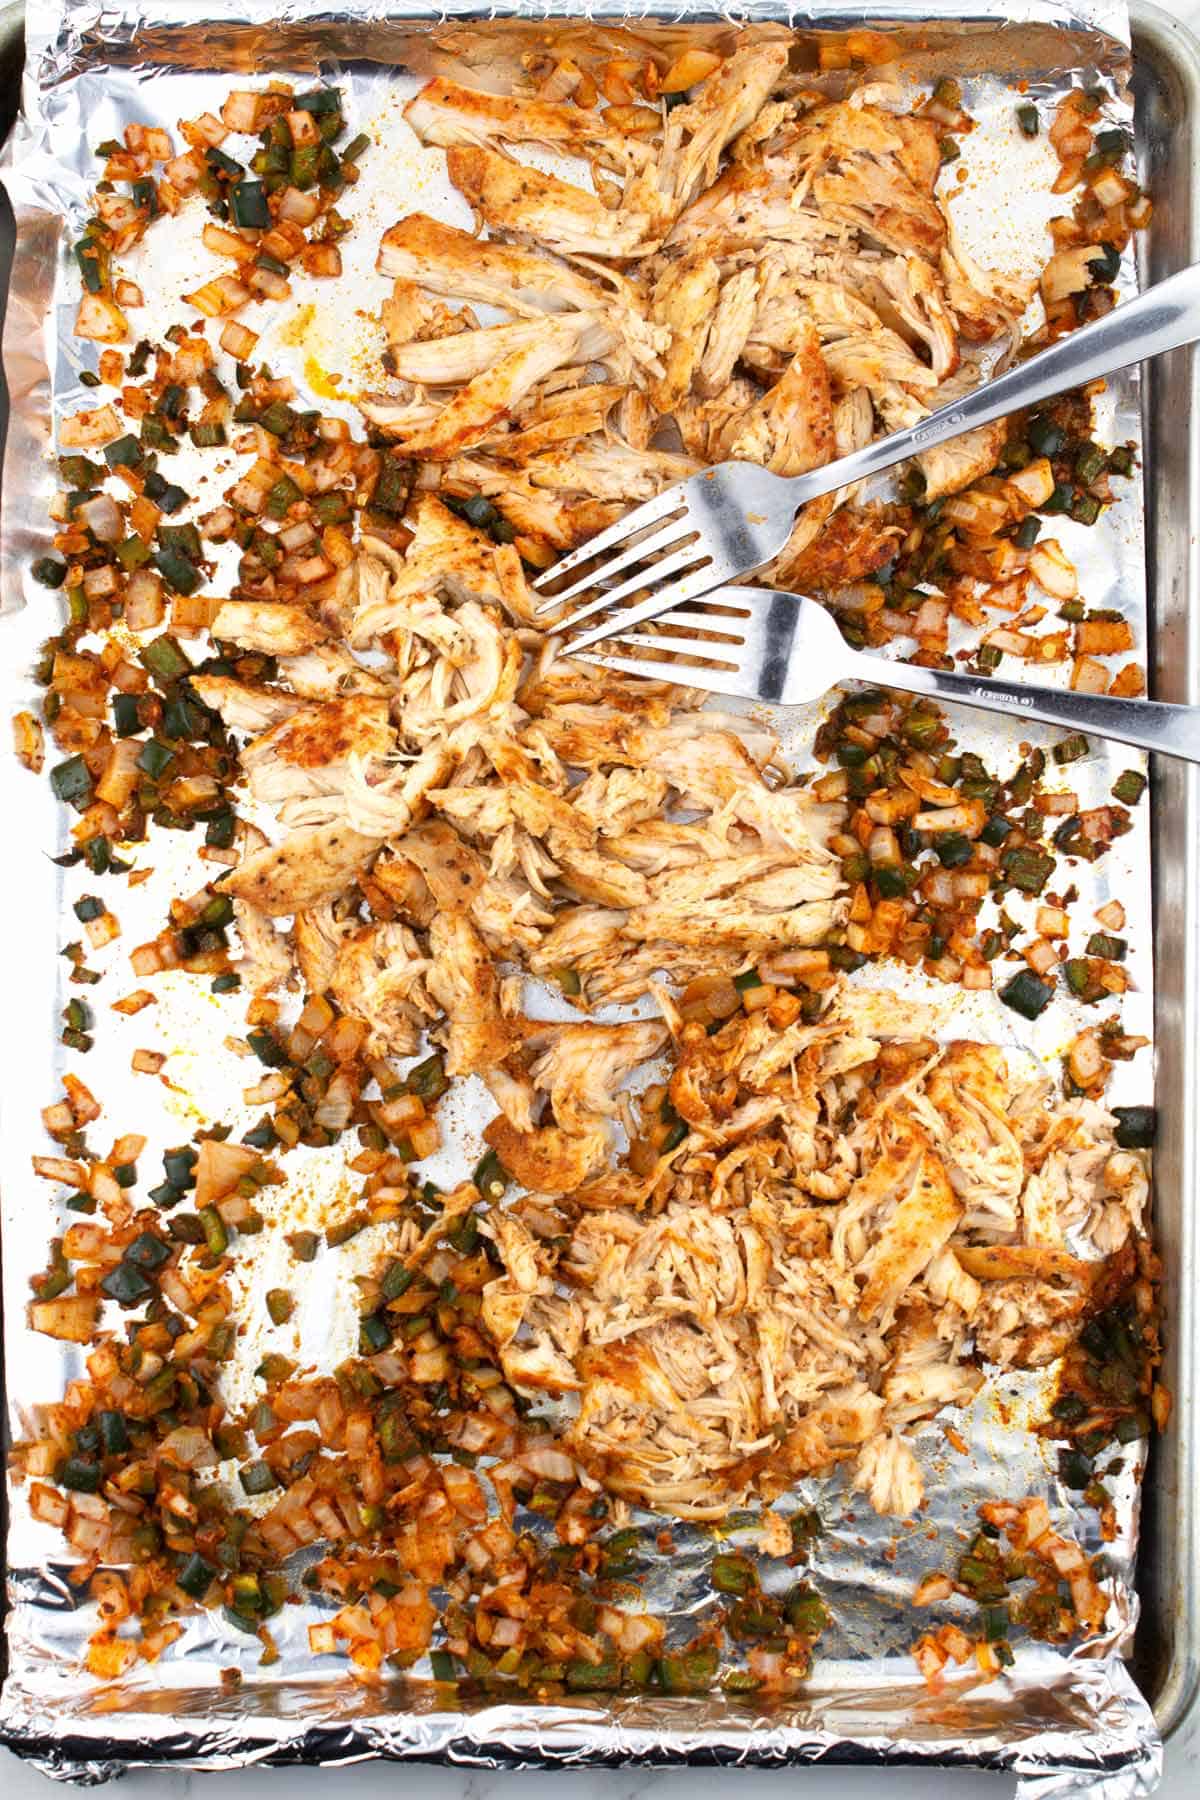
Use two forks to shred the baked chicken taco meat into small pieces. Sometimes I find it easier to scoop it onto a cutting board to do this step, then mix the chicken with the vegetables.
Remove the old foil from the baking sheet and replace with parchment paper. Then warm up the tortillas until they bend easily without breaking (I like to use a damp paper towel or this tortilla warmer).
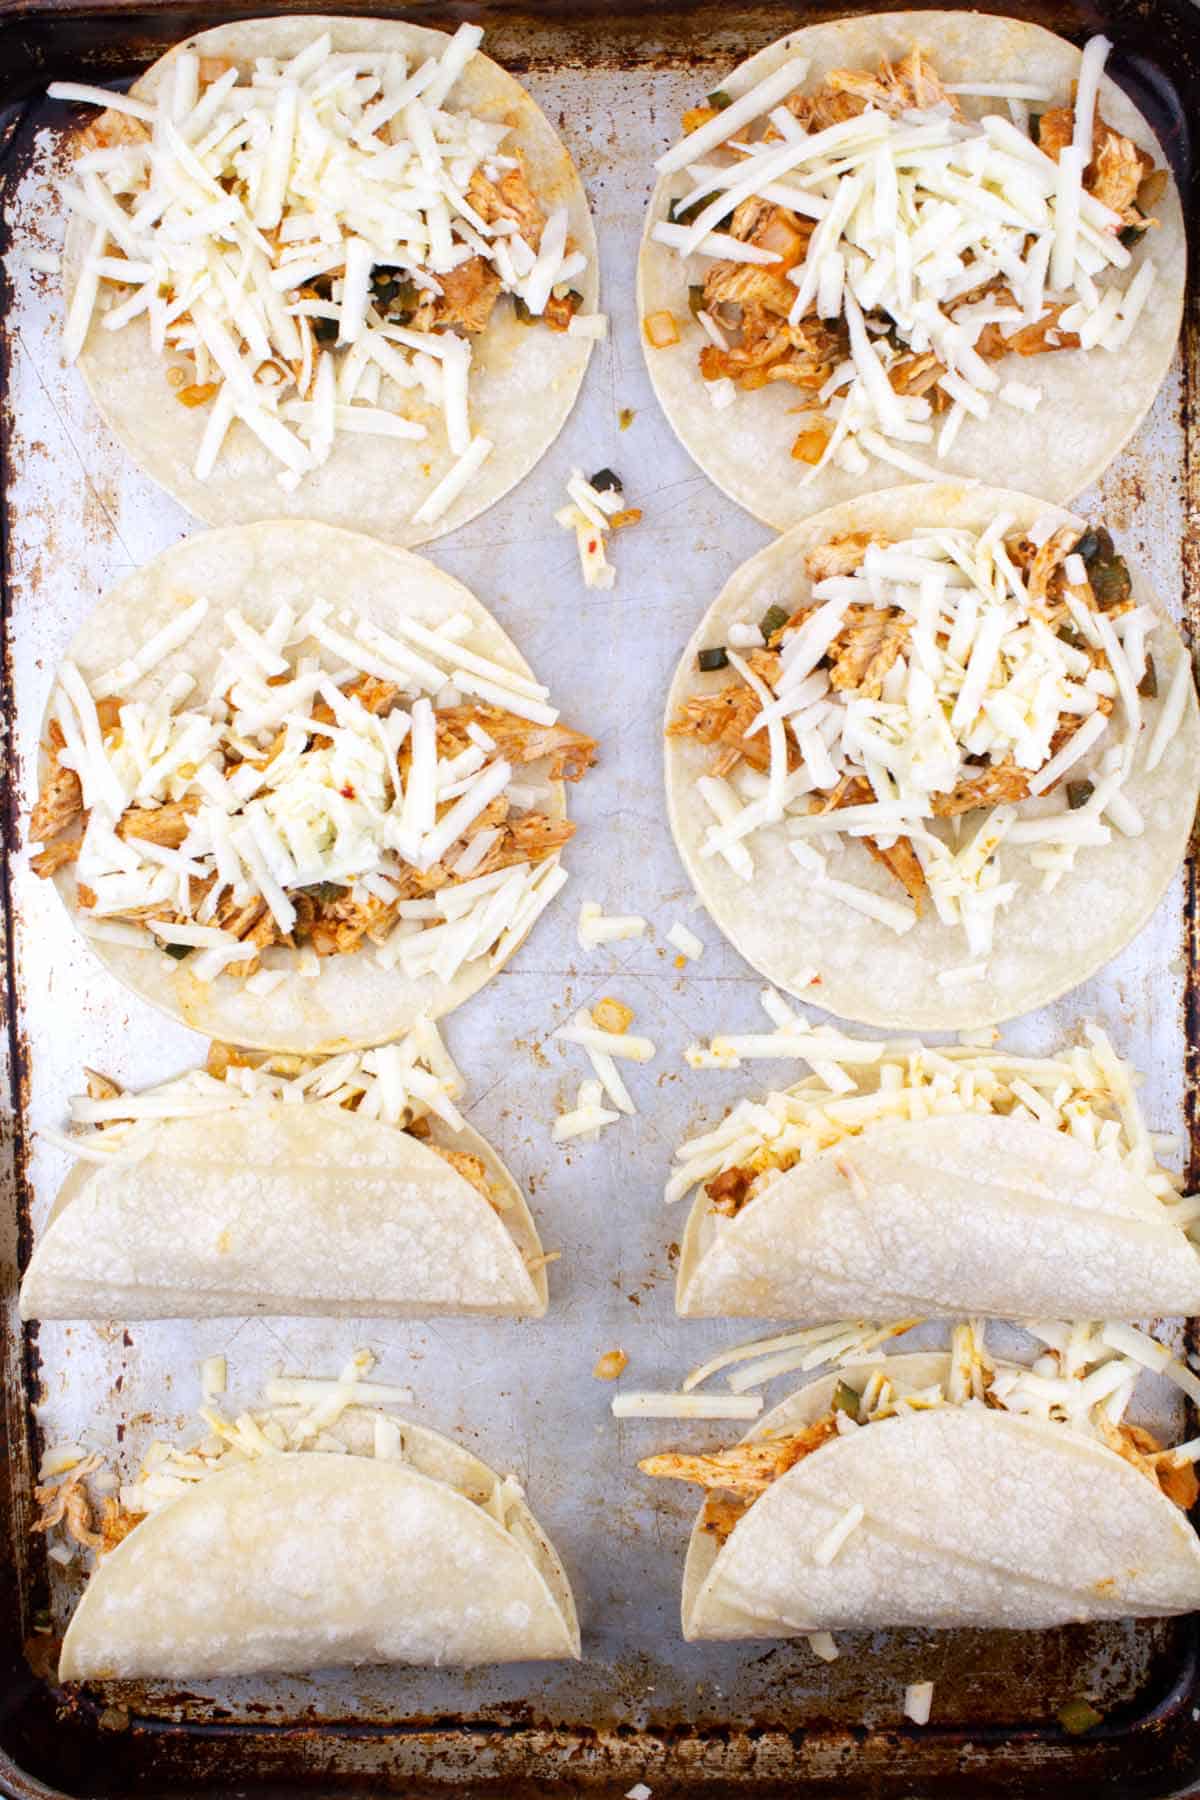
Working quickly, lay out 10 tortillas on each cookie sheet.
Distribute the chicken and veggie mixture evenly across half of each tortillas, then do the same with the shredded cheese.
Fold each taco in half, then use a silicone brush to lightly coat each one in oil (not too much or they will be soggy). Bake for 15-20 minutes until they are golden brown and crunchy.
Hint: Right when they come out, gently separate the crunchy tacos so they don't stick. To ensure they get extra crispy, let them cool on the pan for 5 minutes before eating.
Toppings for baked tacos
- Green salsa
- Red salsa
- Guacamole or avocado chunks
- Sour cream
- Fresh cilantro
- Shredded lettuce
- Diced tomato
- A squeeze of lime juice
- A sprinkle of cotija cheese
How to store and reheat leftovers
These are best fresh when the cheese is gooey and the tortillas are crispy. If you have leftovers, cool them completely (this way they don't get soggy), then store them in an airtight container in the fridge for 3-4 days.
To reheat, you can place them in a hot cast iron skillet to restore a bit of the crisp, or try the oven at 350 for 5-6 minutes.

FAQ
You can use shredded rotisserie chicken to make this recipe faster, but you will still have to cook the veggies on one sheet pan before mixing them with the cooked chicken.
You can freeze the cooked shredded chicken/veggie mix in a sealed container for 2-3 months. Thaw it fully at room temperature, then assemble the tacos as directed. I do not recommend freezing the assembled or baked tacos.
You can also store the prepped chicken mixture and shredded cheese (in separate containers) in the fridge for 3-4 days, then just assemble and bake.

Tips and tricks
- Cut all the veggies the same size so that they cook evenly. You can do a smaller dice or a bit larger dice - we've tried both and they work equally well.
- Use tortillas that are soft and don't look dry. We used soft Mission tortillas, but freshly made from a Mexican market is great too.
- You can flip the tacos halfway through the baking time for more even browning if desired.
- It's tempting, but don't eat them immediately! That extra couple minutes on the pan help them get extra crispy.
Serving ideas
- Cilantro lime rice
- Homemade refried beans
- Cooked red taco salsa
- Mexican Rice Recipe
- Homemade guacomole and your favorite salsas
More recipes
Looking for other recipes like this? Try these:
Recipe

Baked Crunchy Chicken Tacos Recipe (Flavorful!)
Ingredients
- 2 tablespoon garlic minced
- 2 teaspoon chipotle chili powder
- 2 teaspoon cumin
- 2 tsp smoked paprika
- 2 teaspoon kosher salt
- 1 teaspoon black pepper
- 1 teaspoon Mexican oregano
- 1 teaspoon garlic powder
- 1 teaspoon onion powder
- 3 (about 2 lbs) chicken breasts cut in half horizontally
- 1 tablespoon olive oil plus more for brushing
- 2 poblano peppers seeded and diced
- 1 white onion diced
- 1 large jalapeno diced
- 20 corn tortillas
- 1 lb (about 4 cups) pepper jack cheese shredded
For serving
- Optional: Avocado Jalapeno Salsa or your favorite salsa
- Optional: cilantro, lime wedges, sour cream, avocado
Instructions
- Preheat the oven to 450°F. Line two baking sheets with foil.
- Combine the seasonings in a small bowl.2 tbsp garlic, 2 tsp chipotle chili powder, 2 tsp cumin, 2 tsp smoked paprika, 2 tsp kosher salt, 1 tsp black pepper, 1 tsp Mexican oregano, 1 tsp onion powder, 1 tsp garlic powder
- Put the chicken breasts, oil, and half of the seasoning mix into a medium bowl. Mix well until the chicken is evenly coated in seasonings. Then place on the prepared baking sheets, dividing it evenly between the two pans.3 (about 2 lbs) chicken breasts, 1 tbsp olive oil
- Put the veggies and remaining seasonings in the bowl that the chicken was in. Mix well to evenly coat the veggies. Then sprinkle them evenly on the two sheet pans around the chicken. Bake for 15-20 minutes, or until the chicken has reached 165°F and will shred when pulled apart.2 poblano peppers, 1 white onion, 1 large jalapeno
- Place the chicken on a cutting board and scoop the veggies into a bowl. Using two forks, pull the chicken apart into small pieces. Add the shredded chicken to the veggies and mix well.
Assembly
- Remove the foil from the cookie sheets and line with parchment paper.
- Warm the tortillas slightly in the microwave, until they are pliable. Lay out 10 tortillas on each cookie sheet (they can fall over the edge of the pan because they will be folded in half). Moving quickly, layer half of each tortilla with chicken mixture, then cheese. You should divide all of the chicken and cheese evenly on the 20 tortillas.20 corn tortillas, 1 lb (about 4 cups) pepper jack cheese
- Fold the other side of the tortilla over the top of the filling and press down gently. Use a silicone brush to coat the top of each tortilla with oil. Then bake for 15-20 minutes, or until golden and crispy.
- Remove from the oven and gently pull apart any tacos that are stuck to each other. Allow to cool on the pan for about 5 minutes to maximize crispiness. Enjoy!Optional: Avocado Jalapeno Salsa, Optional: cilantro, lime wedges, sour cream, avocado
Notes
- Cut all the veggies the same size so that they cook evenly. You can do a smaller dice or a bit larger dice - we've tried both and they work equally well.
- Use tortillas that are soft and don't look dry. We used soft Mission tortillas, but freshly made from a Mexican market is great too.
- You can flip the tacos halfway through the baking time for more even browning if desired.
- It's tempting, but don't eat them immediately! That extra couple minutes on the pan help them get extra crispy.
Add Your Own Notes
Nutrition
All nutrition information is provided by a third party and is an estimate only. Use your own nutritional calculator for more specific measurements.


Lee says
Crispy and flavorful!