

This super easy step-by-step guide shows you How to Make Brown Butter perfectly every time! It's golden, nutty, and packed with deep flavor-just what you need to level up your recipes. Plus, it comes together in minutes and makes everything taste better!
We have an entire collection of Brown Butter Recipes-everything from main dishes to desserts to sauces. Plenty of ways to put this ingredient to good use!

What is browned butter?
Brown butter happens when you melt butter and keep cooking it until the solids and liquid separate. As it cooks, the milk solids toast and turn golden brown, while the water evaporates. The longer you let it go, the deeper the color and flavor get-so rich and delicious!
The classic method for making brown butter is on the stovetop, but there's more than one process, and we've got you covered! Whether you're looking for a quick method or a hands-off approach, here are all the best ways to get that golden, nutty goodness:
Skip to:
Why brown butter
- Deeply Flavorful: It is toasted and nutty and with a complex and rich flavor profile. Adds layer of flavor to your recipes.
- Super Easy & Quick: It's in one pan with 10 minutes of time.
- One Ingredient: That's right! All you need is butter.
Ingredient
- Butter is the one and only ingredient you need! The best butter for this recipe is European-style, since it has more fat (milk solids) than regular American butter, but we use regular butter all the time and it's still plenty delicious. You can use either salted or unsalted butter, but it's super important that it's actual butter-any substitute won't work


How to make brown butter on the stove
By using your senses-your eyes and nose-you can easily tell what stage your brown butter is at. Keep an eye on the color as it changes from pale yellow to golden brown, and trust your nose to pick up that nutty, toasty aroma. When it smells rich and fragrant, you're probably close to perfection.
- Melt your butter completely. I suggest starting with cubed pieces to help it melt faster and evenly.
- After a few minutes, it will begin to sizzle and foam.
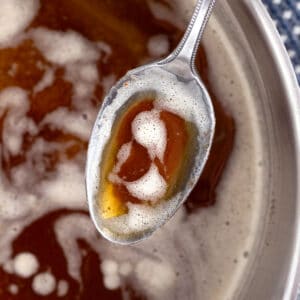
- The foam will start to fade away and the butter will turn a light golden color. The milk solids, which look like small specks, will begin to sink to the bottom. It will also start to smell very nutty and almost caramel-y at this point.
- The foam will continue to clear and the butter will darken the longer it cooks. The milk solids will settle on the bottom of the pan and toast deeply. It should still be very fragrant, but not smell burnt.

Start by melting the butter, stirring often, until it begins to sizzle. Use a medium to large skillet, keeping it on medium heat the whole time to help it cook evenly without burning. It is best to use a light colored skillet to more easily see the color of the butter, but any skillet will do.

Once the butter is completely melted, it will begin to foam up. As it starts to foam, continue to stir and watch carefully for color to begin developing under the layer of foam.

Continue to stir gently. Once it is golden brown, watch carefully and remove it from the heat as soon as it is the depth of color you would like.

Watch your butter very carefully as it nears the last stage since it can go from brown to burnt in a flash. Once it has reached the desired golden color, remove it from the heat and pour it into a heat-proof bowl to prevent continued cooking.
How to store
Once the butter has cooled, pop it into a jar or any airtight container. Store it in the fridge for up to two weeks, or freeze it for up to three months. When you're ready to use it, just let it thaw in the fridge.
Ways to use brown butter
Brown butter can be substituted in almost any recipe that calls for butter. Get creative! I haven't tried one recipe that I didn't like with brown butter. Here are some ideas to get you started:
- In your favorite granola recipe.
- Over pancakes or waffles (try these Famous Farm Buttermilk Pancakes)
- In all recipes with pumpkin or pecans.
- With herbs over chicken. (both this Skillet Chicken with Brown Butter and this Brown Butter Chicken Bites are SO good)
- In rice or potato dishes. (like these Red Skinned Mashed Potatoes)
- Over pasta with fresh herbs.
- In cookie recipes. (my favorite are these Ultimate Chocolate Chip Cookies)
- In all other dessert recipes - bars (Brown Butter Chocolate Chip Bars), cheesecakes, pies, rice krispies, and the list goes on.

FAQs
Yes! Some people think the salt in butter makes it burn faster, but in our experience, that's not the case. We almost always use salted butter because it's what we keep on hand, and it browns just fine. All the photos in our brown butter posts feature salted butter.
Brown butter can definitely be reheated! If you need it softened, just let it come to room temperature until it's spreadable. If you need it melted, gently warm it in the microwave at half power or on the stovetop over low heat. Just keep the heat low and slow to avoid burning it while reheating.
Tips & Tricks
- Use a clear or lightly colored pan or container so that you can easily see the color of the butter.
- The deeper the brown color, the more rich and nutty the flavor will be. You can lightly brown the butter for recipes that you want to add an extra subtle flavor too, or you can brown it deeply for recipes that you want the butter to star in.
- Take the butter away from the heat source as soon as it is the depth of brown you would like. Butter goes from brown to burnt in a flash. Brown butter is magical, burnt butter is not.
- Keep ALL of the brown butter, little specks included. The small specks are the toasted milk solids and they contribute immensely to the flavor of the butter.
Recipe
How to Brown Butter (Quick & Easy)
Equipment
Ingredients
- 2 sticks butter 16 tablespoon pieces
Instructions
Stovetop Instructions
- Melt butter in a large skillet (light colored is best) over medium heat, stirring often.2 sticks butter
- Once melted, it will begin to sizzle and foam. Continue stirring often until it starts to turn golden brown and the milk solids sink to the bottom. Cook until butter has reached the desired golden brown color (see notes for tips on depth of color).
- Remove from the heat immediately and pour into a heat-proof container.
Notes
- Use a clear or lightly colored pan or container so that you can easily see the color of the butter.
- The deeper the brown color, the more rich and nutty the flavor will be. You can lightly brown the butter for recipes that you want to add an extra subtle flavor too, or you can brown it deeply for recipes that you want the butter to star in.
- Take the butter away from the heat source as soon as it is the depth of brown you would like. Butter goes from brown to burnt in a flash. Brown butter is magical, burnt butter is not.
- Keep ALL of the brown butter, little specks included. The small specks are the toasted milk solids and they contribute immensely to the flavor of the butter.
Add Your Own Notes
Nutrition
All nutrition information is provided by a third party and is an estimate only. Use your own nutritional calculator for more specific measurements.


Jen Myers says
This is awesome! If doing a small batch (1/2 stick), would I reduce the cook time in the IP? Thx!
Misty says
Hi Jen, I have not tried a half-batch in the IP. I would expect it to go a little bit faster, so you could start with less time. If it isn't quite as brown as you would like, you can turn the IP to saute and continue cooking the butter until it has reached the color you are looking for. Hope this helps!
Alyssa says
Is it normal for the burn notification to turn on while using the Instantpot?
Danielle says
It can happen, but I don't usually have that problem. You can always turn the instant pot off but leave the insert inside. The residual heat should finish browning the butter. As usual, watch the butter carefully so that it doesn't burn. Let me know if you have any other questions!
Alyssa says
Thanks for responding. I guess I would just like a little further clarification just to make sure I’m doing this correctly. For manual setting it is the high pressure setting for 10 minutes?
Danielle says
Yes. Or you can set it to saute and go through the same stages as the stovetop method. It's not quite as hands-off, but either way should work just as well.
Erin says
Is it possible to do more than 2 sticks of butter at a time in the instant pot? Thanks!
Danielle says
I haven’t tried more than two, but I don’t see why not. My only thought is that it might take a minute longer. If you try it, please let us know how it turns out.
Brittany says
I tried the instant pot method and I really liked it. I liked that I didn't have to stand there and stir it until it was ready. Turned out really golden and smelled amazing!
Misty says
Yes, the IP method is great for hands-free cooking. Glad it turned out well!
Aspen says
This is great! I love using brown butter, but I never realized that you could do it in so many ways. Is it possible to make a small batch of browned butter all at once and then store it in the fridge or on the counter until I'm ready to use it in an actual recipe? Or do I have to make it fresh?
Misty says
Yay, glad you enjoyed it! You can definitely make it ahead and store it. I recommend storing in a glass jar and refrigerating it. Reheat it gently in the microwave until it is fully melted. And make sure to use all the little brown bits that sink to the bottom!